The table below shows the game’s assets and how the player can interact with them. For more details on how the player can interact with these assets, see Final Interactions.
Collectables = items the player can pick up Dialogue = creatures the player can speak to General = other things the player can interact with (that aren’t collectable or able to be spoken to)
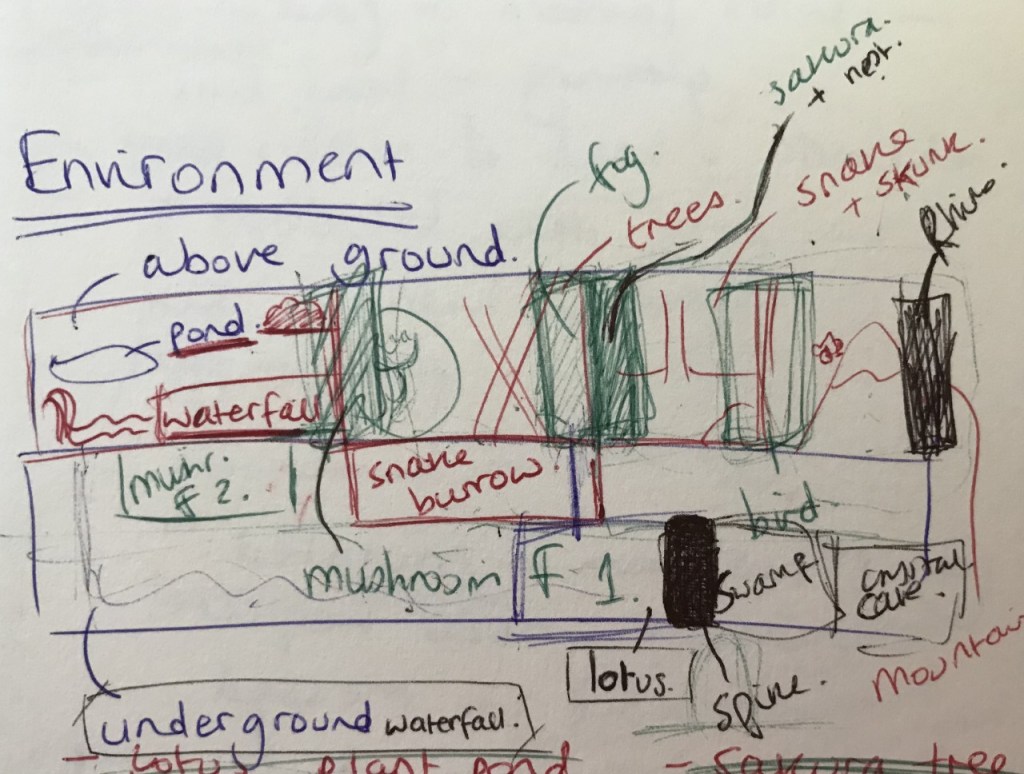
After deciding the puzzles in Task 2.1 – Puzzles and the narrative in Task 2.2 – Narrative, we decided to move onto discussing the environment layout. To begin with, I suggested that we make a list of the different game areas to ensure that we incorporate all of them in the environment layout. I also decided to list the props that appear in each area (if applicable).
List of Game Areas Frog Pond Area (frog, berry bush, above-ground waterfall) Lotus Plant Pond (lotus lantern) Rhino Area (cliff, special flower, grave) Swamp (creature) Crystal Cave Spikes Area Ruined Birds Nest (bird) Mushroom Farm (above ground) Mushroom Farm (below ground) Fog Area (underground area entrance) Sakura Tree (spider) Wind Plant Underground Waterfall Snake Burrow (turtle shell) Snake & Skunk Area
Next, we divided the areas into three sections – above ground, below ground and underground – as a method of deciding on the distribution of the different areas in regards to the three environment levels.
Aboveground Frog Pond Area (frog, berry bush, above-ground waterfall) Sakura Tree Wind Plant Ruined Birds Nest Mushroom Farm (above ground) Rhino Area (cliff, special flower, grave) Snake & Skunk Area Fog Area (underground area entrance)
Underground Crystal Cave Spikes Area Swamp Underground Waterfall
Shown below is the rough draft of the environment layout.
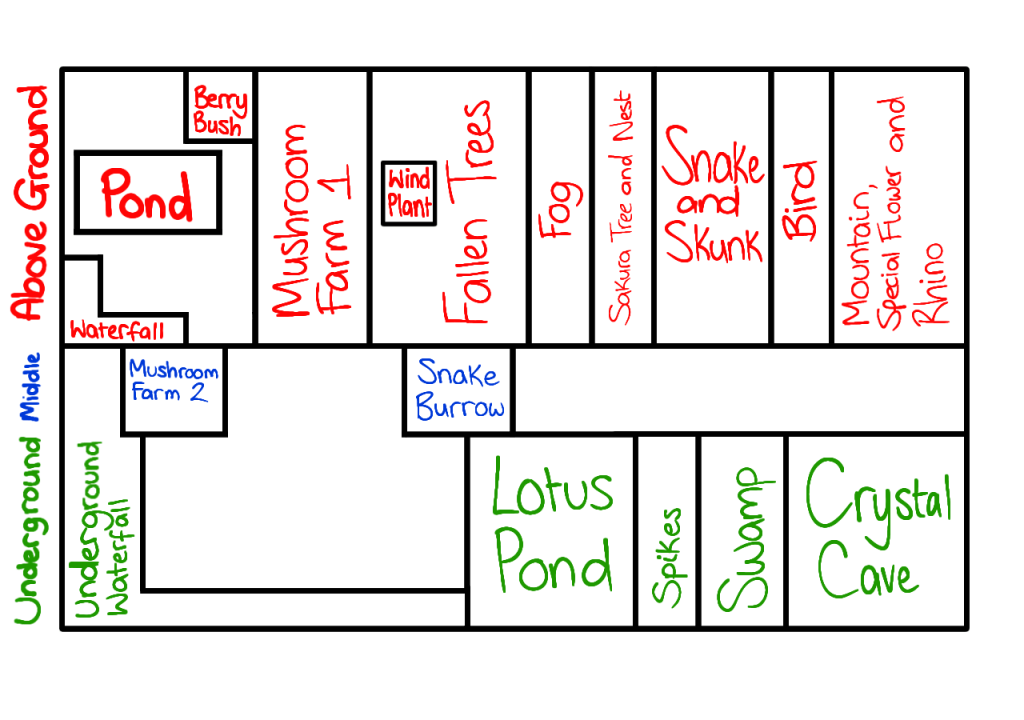
After roughly drafting out the environment layout using both text and diagrams, I decided to draw out a visual version of the environment layout. During this process, we began deciding more clearly on the placement of props/areas in terms of spacial awareness and the order of appearance.
Shown below is the draft of the environment layout in visual form.
After drawing out the environment visually, I created a neater and more finalised version of the environment layout in text form.
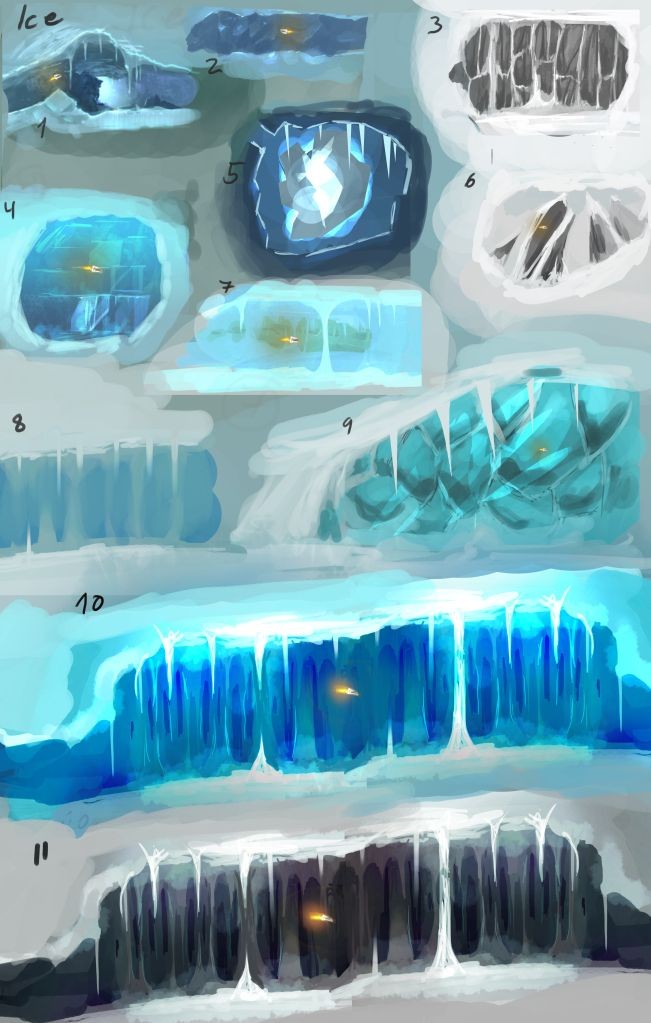
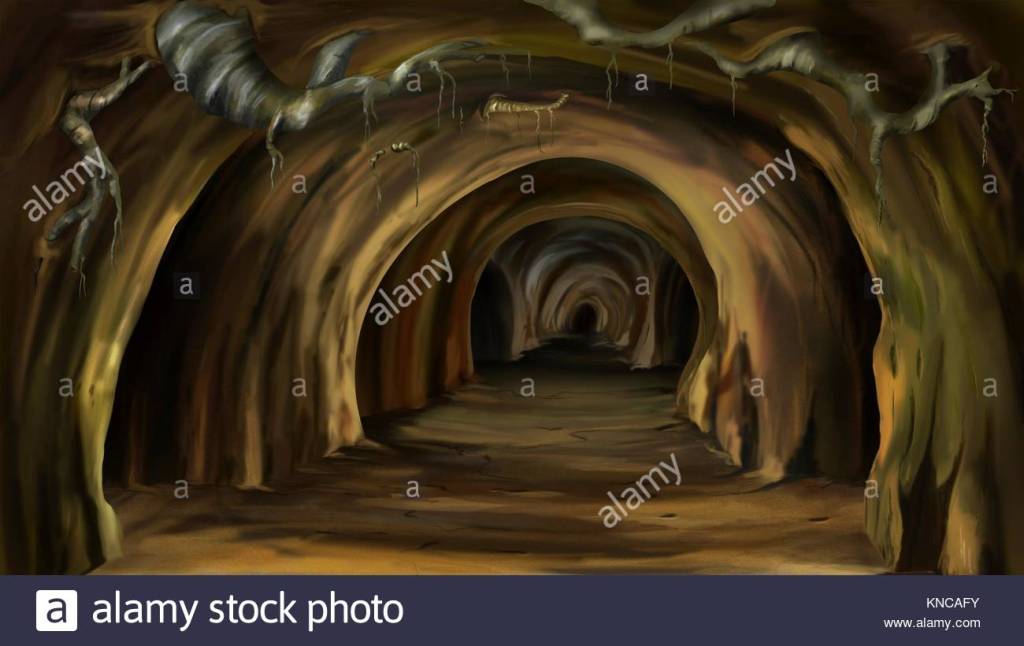
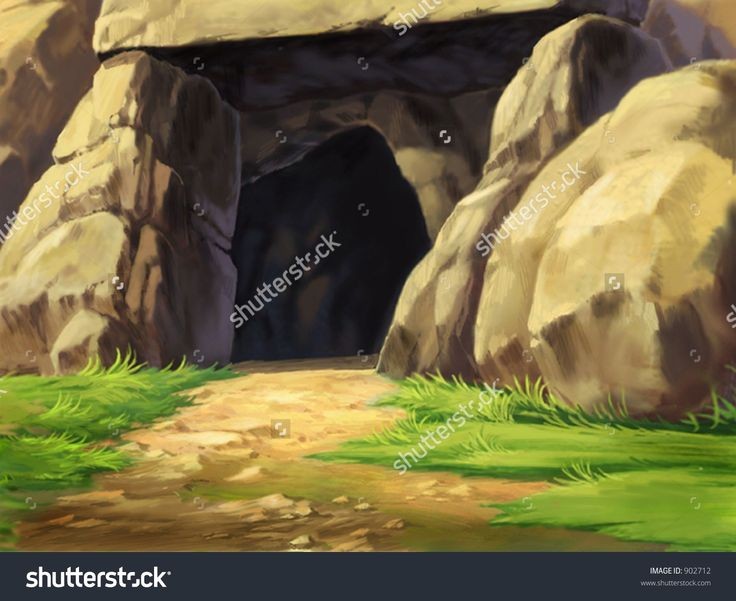
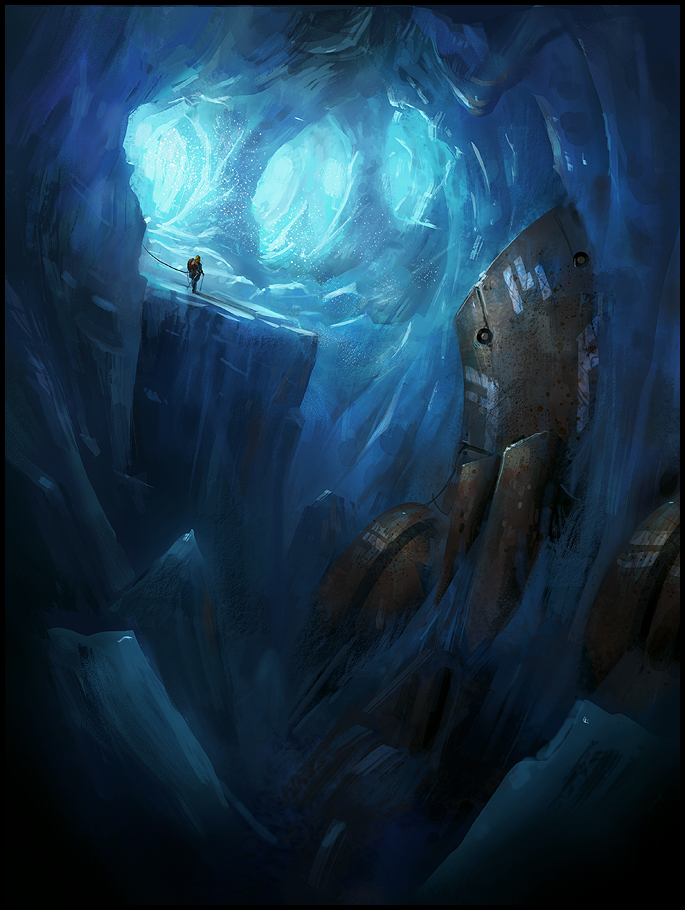
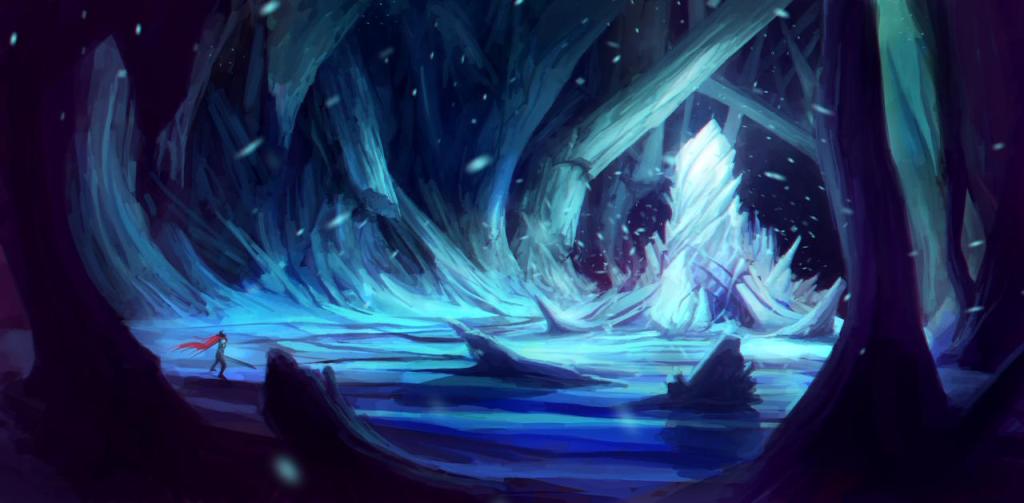
This time, I decided to pay more attention to the crystal cave references I particularly liked and how they distributed their crystals before redesigning the crystal cave. Shown below are the images I collated.
In the references above, the colour schemes for the crystals do not consist of many different colours and the colours that they do include complement the cave colours well – they also do not majorly contrast the cave colours. The colour schemes I especially liked were the blue-saturated ones so the references I chose all utilise a blue-central colour scheme. I also wished to use a similar colour scheme in my own design.
New Crystal Cave Design
When I began the redesigning process, I decided to keep in mind the two previous designs and what I wanted retain from them as well as remembering the advice I was given by the team – use only a few different colours for the crystals, a few different types of crystals, keep the crystal designs simple/orthodox, make the crystals similar in size, lower the amount of crystals and don’t incorporate additional objects.
What to retain – The layered look The cave shape The various rock formations The pond The varying sizes of the crystals
Next, I decided to keep the different types of crystals I incorporate to two. Once again, I used the reference below to choose the types of crystals to implement.
Shown below are the crystals I chose. I had wanted a crystal consisting of several crystals with the other consisting of only one. I also wanted the two crystals to differ in terms of shape but not so drastically that they would fail to complement each other. I also thought that the two crystals possessed complementary colours – they both possessed blue hues in light shades. This supported the blue colour scheme I wanted to incorporate into the new crystal cave design.
Shown below is the new crystal cave design. I drew the layout using the colours I wanted to incorporate. I kept the cave shape similar to the previous design and retained the pond to make for a more dynamic design. Regarding the crystals, I decided to slightly further diversify the two crystal types by adding crystals to some of the designs. I ensured that it didn’t cause the crystals to vary too much in appearance whilst doing so.
After I finished the design, I sent it in Slack to show the team in order to gain their approval before continuing onto painting the crystal cave. My design was approved by the group.
Art Style Research
Before I began painting the new crystal cave design, I decided to further research different art styles I could utilise in the painting. Shown below are the references I used during the painting process. They served as a basis for the styles I used to paint the cave.
Art Methods Research
Before I began painting the crystal cave, I also decided to further research different methods of digitally painting rocks/rocky surfaces and caves to see which method seemed to best suit the game’s art style. I also has to keep in mind the project deadline – whichever method I chose had to be one I could utilise in a timely manner.
Additionally, I had wanted to explore the different methods to gain an idea for how one could efficiently paint a cave – it was something I had little experience in so I thought researching and trying out various methods was a good way of improving my knowledge/skills.
Furthermore, prior to painting the cave, I made two colour palettes – one for the cave and one for the crystals – so that I could plan the colour scheme prior to the drawing process. I thought it would help me stay focused as well as making it easy for me to colour-pick the shades I want.
I used the second image from my ‘art style research’ to create the cave colour palette whereas the crystals colour palette was based on the two chosen crystals.
Cave Colour Palette
Crystals Colour Palette
Shown below is the first draft of the crystal cave painting.
New Crystal Cave WIP (version 1)
I liked the colours used for the upper half of the cave but I thought that the ground and the pond’s colours didn’t complement the rest of the cave or each other. The ground’s colours were too faded and the pond blended in too much with the crystals. The ground’s shading also needed polishing.
Additionally, the two platforms’ colours were slightly too contrasted for my liking and the uppermost rock formation lacked contrast. I also had to polish the crystal shapes and finish giving them outlines to help with shading them later.
In order to remedy all these issues, I firstly decided to increase the contrast of the uppermost rock formation and painted it to make the rocks more defined.
Next, I polished the ground using colours from the uppermost rock formation. I also painted the two platforms more to make their colours lessen in contrast.
Finally, I repainted the pond in different colours to make it contrast the crystals and stand out more. I also polished the crystal shapes and finished outlining all the crystals.
Shown below is the edited version of the crystal cave painting draft.
I began the task by colouring the different layers/objects in. I chose the cave colours based on the ‘art style research’ references found further below. The crystal colours were picked based on the crystal reference below. The colours range from bright to pastel shades.
Shown below is the coloured sketch.
Art Styles Research
I decided to begin the painting process since I finished colouring the layout quite quickly. Before I began painting the crystal cave, I decided to research some different art styles I thought would be suitable for the game. I was looking for a fairly simple style that didn’t possess too much detail. Shown below are the styles I chose as references to base my style on.
Art Methods Research
Additionally, I also watched some videos of ‘digital cave paintings’ so that I could see the process and gain some insight into the different methods one can use to paint caves/rocky surfaces.
Shown below is the crystal cave in the early stages of painting. I experimented with different methods of painting rocks/rocky textures to see which would look best. For the crystals, I chose to use a simple painterly style that I could later decorate with sparkles/glows. Regarding the water, I did a quick, simple shading for it as a start – I wanted to research more about methods of painting water before deciding on a style.
Crystal Cave WIP
After painting the crystal cave a bit, I stopped to look at the design and thought that it looked too crowded and the colours seemed too chaotic – they didn’t complement each other or the cave well. I planned on solving these issues by scaling down some of the crystals so that they took up less space and altering the colours of the crystals to make them appear more cohesive.
However, I decided to leave it be for now and present it to the group to get more feedback before making any changes.
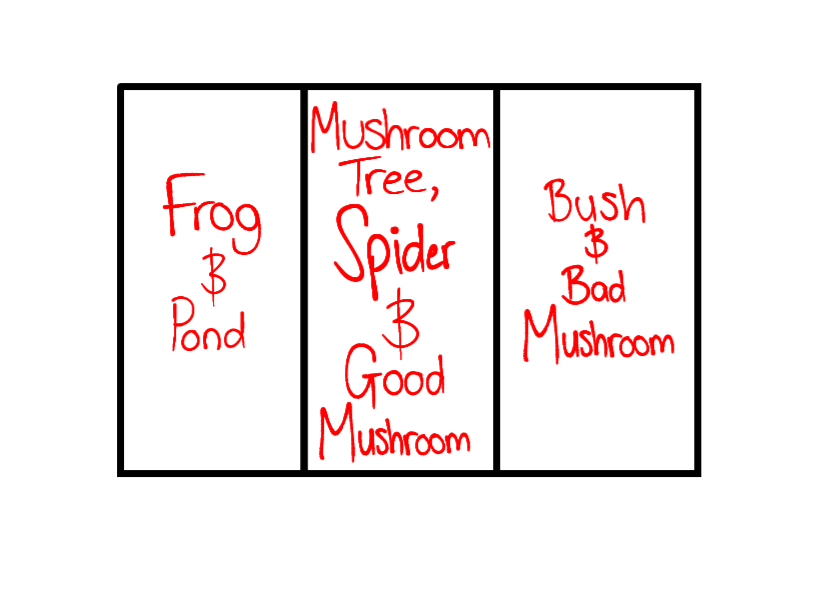
The diagram below showcases the final environment layout, which was created during the second scope reduction in Team meeting 10.
Once again, the sections are not to scale – the diagram merely displays the order of the items’ appearances. Each section represents its own space – and items that share a section will appear in the same space.
Becca presents an updated version of the environment – all the layers are almost finished Shannon presents text box designs Feedback is given Bernardo gives an update – there was an issue with the text boxes – the different colours contrast too much Shannon states that she’ll change the colours Shannon presents the text boxes with altered colours Bernardo states that the environment layers were too big – they wouldn’t load properly in GameMaker – they need to be less wide Becca states that she will try to shorten the environment Bernardo tries cutting the environment layers – they now work in GameMaker except for the rock layer – it may also need to be cut short Becca sends the shortened versions of the environment layers I get asked to send the deer animations as transparent gifs & to turn the animation into a walking loop I make a walk loop andtry rendering them as transparent gifs in Krita but they ended up being outlined in red I tried researching the internet to see if there was a solution for it but I couldn’t find one so I sent them to Bernardo stating the issue Bernardo said that the red outline was an issue and that he’d try to fix it later I decided to try using a website that converts images into gifs and managed to render the animations as transparent gifs without the red outline I send the new transparent gifs
Friday 15th May
Natasza presents different spider tree web designs There was a short discussion about making the shading in the game more consistent Becca presents the finished environment layers
Saturday 16th May
Shannon is tasked with designing and drawing the cursor & dialogue room backgrounds I give an update – I need to extend my deadline to Tuesday or Wednesday due to being ill and unable to do much work Bernardo sanctions my request
Monday 18th May
Bernado states that the deer walking animation has an issue with quality – the frames have been compressed – I didn’t notice that until now I realise that this must be due to the website I used compressing the images as Bernardo said that the gifs rendered in Krita didn’t have this issue Bernardo asks if I can solve this issue I suggest trying to use a different software to render the gifs – I research to find some free alternative programs but I fail to find any I decide to send the frames as transparent pngs instead so that anyone who possesses a different program would try rendering it as a transparent gif Bernardo states that this was a good idea as he could now load the frames individually I was asked to send a transparent image of the deer standing still – I sent it Nataszapresents the finished spider tree Becca is asked to make the environment layers taller Becca sends the altered layers Becca suggests doing some animations for the environment
Tuesday 19th May
Becca is tasked with creating some animations for the environment – she asks me what animation program I use – I state that I use Krita Natasza is tasked with designing and drawing the bush
Becca’s Task: Create animations for the environment Deadline: Undetermined
Natasza’s Task: Design/draw the bush Deadline: Undetermined
Wednesday 20th May
I present the deer sitting down & getting up animations Bernardo stated that the front legs seem a bit stiff and they shorten in the sitting animations – I was tasked with fixing this
My Task: Fix sitting animation Deadline: Undetermined
Thursday 21st May
I present the fixed version of the sitting animation
Friday 22nd May
Shannon presents different cursor designs & dialogue room backgrounds Natasza presents bush designs Feedback is given Natasza chooses a bush design Becca presents environment animations – she asks if Bernardo would like the frames
Saturday 23rd May
Bernado states that he would like the environment animations to be sent as frames
Sunday 24th May
Shannon presents the finished cursor designs
Monday 25th May
Bernardo asks for an update from Becca, Shannon and Natasza Becca sends the ‘mushroom lamp bug’ animations frames – Bernardo states that he will implement them later to see if they work Shannon sends the final dialogue room backgrounds Bernardo sends a video of how the vertical slice functions so far – it is almost complete
Tuesday 26th May
Natasza sends the final bush designs coloured Feedback is given A bush design is chosen Bernado sends a video showcasing how the ‘mushroom lamp bug’ animation works in the game – he asks if the animation’s speed is correct Becca states that the speed is fine Bernardo gives an update – he will continue implementing features into the vertical slice Becca asks Bernardo if it’s possible to zoom out of the walking layer as it seems too zoomed in Bernardo states that doing so would break the game Becca states that it’s okay to not implement the change as it was a very minor issue
Wednesday 27th May
Bernardo sends a video showing how the vertical slice looks so far – he asks for feedback and also sends the game file so others can play-test it Shannon states that there was a weird line in part of the background Bernardo states that he had to split the background into two as GameMaker couldn’t handle it otherwise Shannon asks if the player isn’t meant to be able to walk past the frog without talking to it Bernardo states that he had made it so that the frog starts speaking to the player when they walk past it – this means the player knows that they can speak to it Bernardo states that he had also done the same with the spider Bernardo states that he’ll look through some royalty free libraries for a suitable soundtrack later – he says that if we have any suggestions, we should let him know Shannon asks if it’s possible to make the text appear at a faster rate as she can read the text faster than it appears Bernardo states that he can do so and asks how fast she wants the text to scroll Shannon states that she’s unsure of how to answer with a specific speed – she says that it should at least be twice as fast as the current speed Bernardo sends a video showcasing the new text-scrolling speed and asks Shannon how she finds the new speed Shannon gives her approval Becca sends a link to her project budget blog page as a guide for the other team members if they need it Bernardo sends his own project budget blog page as a guide for others – he also gives Becca some advice on her budget Becca thanks Bernardo for his advice and says that she’ll fix her mistakes
Becca presents different colour scheme options for the environment Feedback was given Becca states that she will try implementing glowing mushrooms in the colour scheme options next before deciding on a colour scheme
Wednesday 29th April
Shannon presents different good mushroom and bad mushroom designs Feedback was given The final good and bad mushroom designs were decided upon Becca presents different colour schemes for the glowing mushrooms Feedback was given Becca decides that the daytime colour schemes look better She chooses a colour scheme – red/pink hues Bernardo gives an update – he is trying to implement dialogue trees
Thursday 30th April
Becca presents the final layout for the environment Bernardo sends a video displaying how parallax scrolling worksto help Becca understand how the environment layers should look Bernardo tried implementing the environment layers into GameMaker -the file got corrupted since the layers were too large Becca scales down the layersand sends some for Bernardo to test Bernardo states that the layers work now but they appear to be blurry Bernardo states that it is due to GameMaker auto re-scaling large files Bernardo fixes this issue Becca sends the rest of the layers scaled down Shannon presents the final mushroom designs Shannon is tasked with making the title screen
Shannon’s Task:Make title screen & its buttons Deadline: Undetermined
Friday 1st May
I present the new dialogue as images to Bernardo I am tasked with animating the deer I am asked to choose what animations I can get done by Friday I choose the walking and talking animations as they are the most important Natasza presents the spider and its animations Natasza is tasked with making the spider tree – it can be any tree – doesn’t have to be a mushroom but it does need a web
My Tasks: Animate the deer walking & talking Deadline: Friday 8th May
Natasza’s Task:Draw design ideas for the spider tree Deadline:Friday 8th May
Saturday 2nd May
Sharna presents the frog and its animations Becca suggests that Sharna change the frog’s idle animation so that the belly moves as well as the head and front legs Sharna is tasked with changing the frog’s idle animation according to Becca’s suggestion Sharna is also tasked with animating the frog talking – one with normal eyes and one with angry eyes
Becca presents an updated version of the environment – some layers are now coloured Bernardo gives an update – he is implementing the dialogue into the game I ask for the resolution the deer walking animation should be in I am told that the resolution is 375 x 375 I was asked by Bernardo to send him the dialogue in text format I email him the dialogue as word files Bernardo gives another update – he had to remake the dialogue system as the old one wasn’t working – he sent a video of the dialogue system working
Wednesday 6th May
Becca gives an update as to where she’s at now – she’s practising how to paint rocks and shows two different art styles Becca decides to choose the less textured one – it suits the game’s aesthetic better Becca presents an updated version of the environment – more layers are completed
Thursday 7th May
Bernardo has implemented these mechanics into the game: left click to interact with objects, characters & buttons press space to speed up text & end conversations Bernado sends a video showing these mechanics working I give an update – I need to extend my deadline to Monday as Opentoonz had crashed on me – this meant I had to switch to Krita and redo everything from the start Bernardo sanctions my request Bernardo sends some examples of songs he thinks would suit the game – the game’s current music was deemed as possibly being too upbeat
Friday 8th May
Natasza presents the spider tree designs Feedback is given Natasza chooses a design – she is tasked with finishing the spider tree Shannon presents title screen research and menu templates Shannon presents game logo font ideas Feedback is given Shannon chooses a font Shannon presents the finished title screen Shannon presents ideas for decorating the logo Feedback is given Shannon chooses one Shannon is tasked to do the text boxes
Shannon’s Task:Design text boxes Deadline:Undetermined
Sunday 10th May
Shannon sends all the menu elements separately so that Bernardo can implement them into GameMaker
Monday 11th May
I present the deer walking and talking animations I get tasked with animating the deer sitting down and getting up I get asked to create my own deadline– I set it at Friday – Next Monday
My Tasks:Animate deer sitting down & getting up Deadline:Friday 16th May – Monday 18th May
Wednesday 13th May
Bernardo clarified that the dialogue room backgrounds will need to be designed – otherwise, it’ll just be a zoomed in version of the environment Shannon presents colour schemes for the text boxes Feedback is given Shannon chooses one – the opaque pink one
In this meeting, we decided that another scope reduction was necessary as we only had a few weeks left to finish the project and too many things to still do. This time, we thought it would be best to reduce the scope so that it only shows off the essential game mechanics.
Essential Game Mechanics Dialogue-choosing Mutating Environment interaction Character interaction Picking up items/dropping items Giving items away Walking Puzzle-completion/Reward-gain
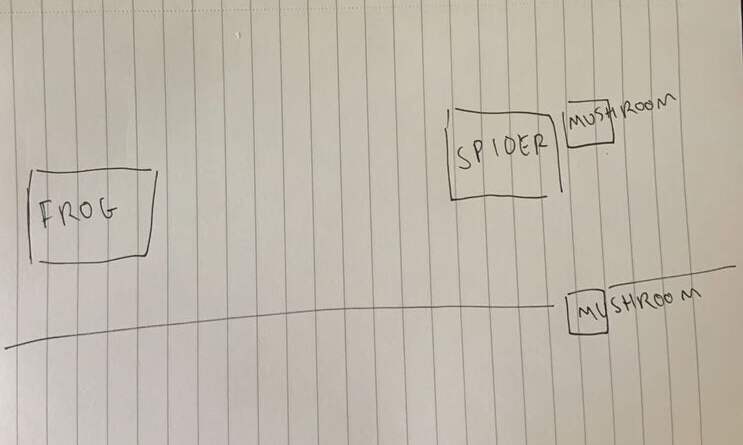
This meant that we only needed one quest in the scope. We chose the second frog quest, i.e. the mushroom quest, because it was the most important one – it allows the player to complete the level. Consequently, the environment was reduced to the frog pond and the snake burrow. However, we decided that the snake burrow was an unnecessary environment if its only goal is to hide the mushrooms. Furthermore, it hasn’t been designed/drawn yet so we decided to cut it from the final scope. This left the issue of where the mushrooms would go if not in the burrow. They needed to be hidden. We entertained the idea of having the mushrooms be in the crystal cave since it was already designed and partially drawn but the crystal cave was deemed as unnecessary due to it containing too much arbitrary detail. Then, we discussed how it could just be a simple cave but that seemed to also be unnecessarily adding a new environment to the scope.
Shannon decided to still draw a quick diagram of the current scope idea for reference to go from. It consists of the frog pond, the cave and the two mushrooms in the cave. Below is the diagram.
Eventually, we decided to hide the mushrooms using a prop from the environment, such as leaves or a bush, so that we could showcase environment interactions in our scope. This idea was taken forward as it was a good method of incorporating environment interaction without complicating the game scope.
However, the quest seemed too simplistic to be entertaining. We thought that including another NPC to act as an obstacle between the player and the mushrooms would be a good method of remedying this. At first, we were picturing a physical obstacle so we posited the snake as the NPC we needed. However, we couldn’t think of an easy way to have the player move the snake without it overly-extending the scope and the snake’s original quest was too convoluted to include.
Therefore, we decided to try using the other NPC – the spider – instead as a viable solution. We discussed how we could involve it in the mushroom quest by having it possess the good mushroom in its web whilst the bad mushroom could be hidden in the environment. That way, we could use the spider’s dialogue to hint at the poisonous mushroom’s existence whilst also showcasing environment interactions.
The spider could ask the player for the bad mushroom in exchange for the good mushroom – this allows the player to discover the option to kill the frog. Afterwards, the player can choose to trade the mushrooms or keep the bad one to give to the frog. We also decided to make both mushrooms appear in plain sight, otherwise the player might fail to realise that there are two mushrooms they could give the frog – they think they only need one. This meant the bad one would have to only be partially hidden whilst the good one is clearly in the web. This newly altered version of the mushroom quest was readily accepted by the group and so, was taken forward as part of the final game scope.
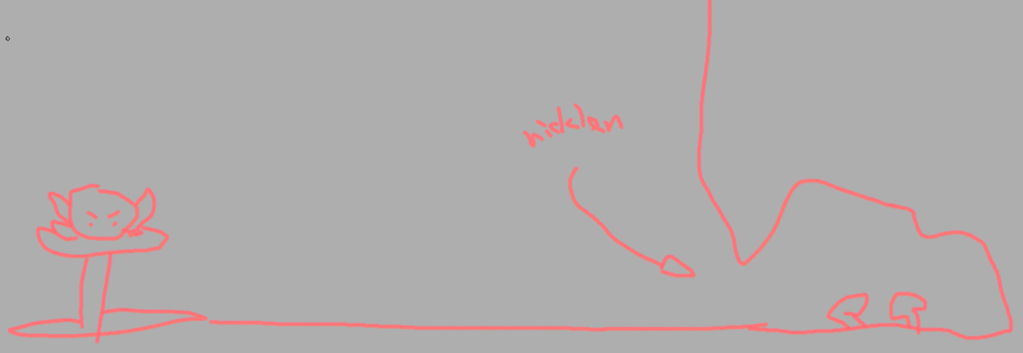
Shown below is the changed environment layout for the final scope. It consists of the frog pond, the spider/mushroom tree and the good mushroom in the web and the bad mushroom on the ground.
I stated that the bad mushroom should be hidden by something the deer could easily move, such as foliage. Bernardo then proceeded to suggest we have the bad mushroom be half-hidden in a bush to the right of the mushroom tree. A bush would be easy to implement and it is a prop that the deer can easily move. Thus, the idea was accepted by the group and incorporated into the final scope.
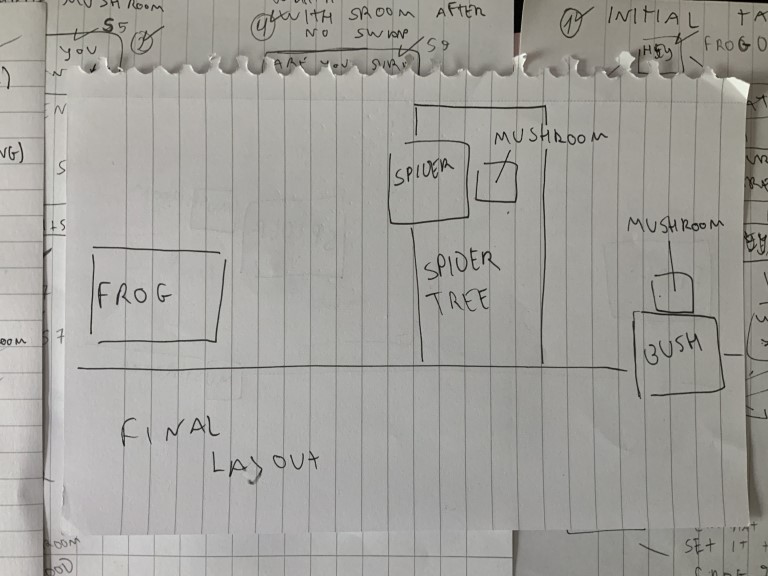
Shown below are the final environment layouts for the new game scope.
Final Environment Layout(visual)
Final Environment Layout
Next, we made an asset list for the new project scope.
Asset List Frog world (pond) Frog (close up, quiet & talking) Spider world (spider tree) Spider (close up, quiet & talking) Good mushroom Bad mushroom Bush Muntjac (close up, quiet, talking, walking & sitting)
Dialogue Frog – First time talking Second talk onward before getting mushrooms Talking with bad mushroom Talking with good mushroom
Spider – First time talking Second talk onward before getting mushroom Talking with the mushroom Talk after swapping mushrooms Talk after not swapping mushrooms
Afterwards, we discussed how we could cut out any unnecessary animations. We concluded that the ‘frog dying’ animation and the ‘frog helping the deer to the ledge’ animation were both too convoluted to include in the scope. Instead, we decided to just use text to convey to the player what was happening – e.g. frog dies.
Finally, due to the drastic scope reduction, some of us were now left without a role and required role reassignments. We ended the team meeting by reconfirming and/or assigning ourselves new roles as well as distributing tasks to everyone.
Before creating our project budget, we were told to assume that: We are an independent studio We have the means to publish our game – do not consider the costs for publishing the game – consider only the costs for the development of the game We have basic hardware – e.g. PCs All teammates have an annual income
We were also told to consider only the costs for making the vertical slice – not the whole game.
Making the Project Budget (version one)
We took into consideration each team member’s wages, which were calculated by hour per week and multiplied by 14 to get the total wages for the project’s duration.
Additionally, we also considered software and equipment we would need to use for this project. We decided to include the cost of Clip Studio Paint Pro multiplied by the amount of artists in this project (4) Clip Studio Paint Pro was chosen as the more expensive EX version mainly offered benefits for animators. It was also the one art program most of us had/used.
In regards to equipment, we decided to include graphics tablets for the artists. We chose the Cintiq as it was industry standard.
Shown below is the project budget for our vertical slice.
Risk Mitigation: (7-12% of the total production costs) £2413.72 to £4137.81
Profit: (multiply budget by the % you need the project to return & divide the value by the number of units you think the game will sell)
We were told that a survey would be given out during the arcade in which our vertical slices would be played by visitors. Each person who says they would buy our game will represent 100 sales. After some discussion as a team, we estimated that 30 people would say they would buy our game – this meant we estimated that our game would generate 3000 sales.
We researched for similar games to our’s on Steam to see how they were priced on average. We searched for click-and-point games – they ranged from £10-£15 on average. We decided that since we were only making a vertical slice, we would price at the lower price of £11. This meant that we had estimated that we would sell 3000 lots of £11, which equated to a total of £33,000 in sales.
We also decided that the % of the budget we wanted the project to return had to be enough to fund another game project – we were advised to not make this % too high to ensure we are not too idealistic. We were told to keep this % between 10-15%. We chose to use 12%.
£34,481.74 x 12 = £413,780.88 £413,780.88 divided by 3000 = £137.93
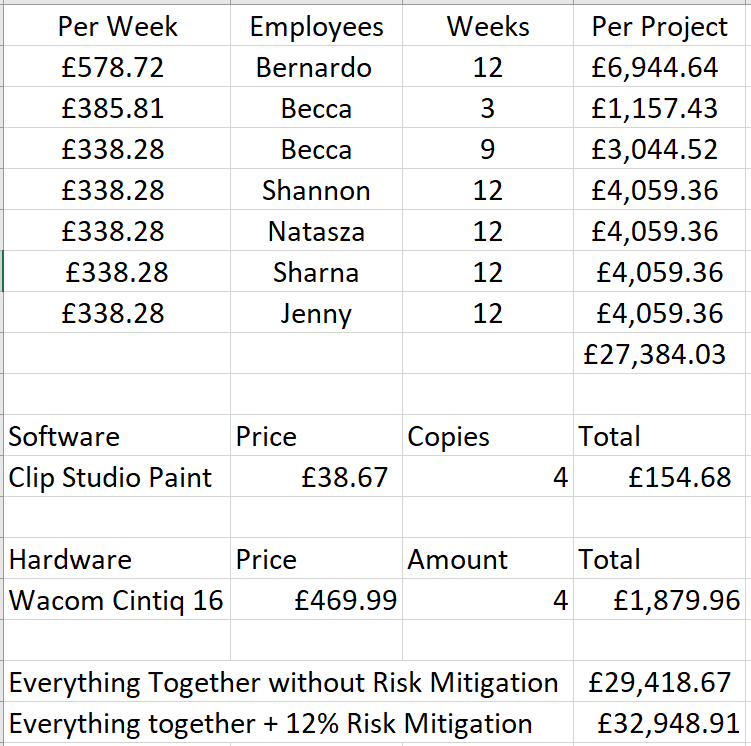
Making the Project Budget (version two)
After deciding the amount of time each game element would need to be completed and assigning roles to all team members, we created a new project budget. In this new budget, we changed the amount of weeks each member should be paid for according to the amount of time they needed to complete their assigned work.
Profit: (multiply budget by the % you need the project to return & divide the value by the number of units you think the game will sell)
This time, we decided that the amount of profit we would need the project to return should be the production cost amount itself. This meant that we would need to make back the budget costs in the game’s sales. This made the % we wanted the project to return be 200%.
£32,948.91 x 200 = £6,589,782 £6,589,782 divided by 3000 = £2196.59
In this meeting, I presented the layout for the crystal cave I had drawn. I had decided to begin painting it as well since I finished the layout ahead of time. My cave design was deemed to be filled with too many crystals as well as lacking a sense of cohesion – there were too many different types of crystals in too many varying colours and sizes. Therefore, I was tasked with redesigning the cave, keeping in mind to stick to using only a few different colours for the crystals, a few different types of crystals, make the crystals similar in size and lower the amount of crystals I incorporate.
Additionally, I was told that it was difficult to recognise certain crystal designs as being crystals – such as the biggest crystal and the leaves-shaped crystal. In order to remedy this, I decided to keep the new crystal designs simple and orthodox so that viewers can easily recognise them as crystals. I also thought getting rid of the accessories, such as plants, would be a good way of making the new design less crowded and chaotic .
I was also asked to send a draft of the rough design in Slack to get the team’s approval before painting the environment in case I end up wasting time painting a piece that may be rejected.
My Task: Redesign and draw the crystal cave Deadline: Undetermined